LLM으로 테이블과 차트 생성
ChartLLama (논문 링크)와 LIDA (논문 링크)를 보면 파이썬 코드로 matplotlib를 통해서 생성하는 것을 확인할 수 있다.
올해 나온 ChartCoder라는 모델 (논문 링크)도 마찬가지로 테이블과 그림을 코드를 이용해서 그린다.
ChartLLama
논문: 링크
Github: 링크
LIDA
논문: 링크
Github: 링크
홈페이지: 링크
ChartCoder
논문: 링크
Github: 링크
실습한 코드는 본인의 Github (링크)에 업로드 했다.
Table 생성 프롬프트
from langchain_openai import ChatOpenAI
from langchain.prompts import PromptTemplate, ChatPromptTemplate


# OpenAI LLM Wrappers (ChatGPT 또는 GPT-4 모델 사용)
llm = ChatOpenAI(model="gpt-4.1-mini", temperature=0.4)

system_prompt = """You are a helpful assistant. You will produce a figure or table based on the user's request."""

# 프롬프트 작성
request = """
다음 데이터를 기반으로 테이블을 생성하세요:
- 열: 이름, 나이, 직업
- 데이터:
  - Alice, 30, Engineer
  - Bob, 25, Designer
  - Charlie, 35, Teacher
"""

prompt = ChatPromptTemplate.from_messages(
    [
        ('system', system_prompt),
        ('human', '### User question ###: {request} ')
    ]
)


chain = prompt | llm

result = chain.invoke({"request": request})
from pprint import pprint

pprint(result.content)

>> ('| 이름    | 나이 | 직업      |\n'
 '|---------|-------|-----------|\n'
 '| Alice   | 30    | Engineer  |\n'
 '| Bob     | 25    | Designer  |\n'
 '| Charlie | 35    | Teacher   |')
본인의 예상보다 더 깔끔하게 테이블 형태로 반환해줌을 알 수 있다.
def clean_table_string(table_str):
    """문자열 형태의 테이블을 정리"""
    # 따옴표와 괄호 제거
    clean_str = table_str.replace("'", "").replace("(", "").replace(")", "")

    # 줄바꿈 처리
    clean_str = clean_str.replace("\\n", "\n")

    return clean_str

# 예시: 노트북의 table 변수 정리하기
table_clean = clean_table_string(table)
with open("cleaned_table.md", "w", encoding="utf-8") as f:
    f.write(table_clean)
위 코드를 사용하면 문자열 형태의 테이블을 마크다운 형식으로 저장할 수 있다.
Chart 생성 프롬프트
from langchain_google_genai import ChatGoogleGenerativeAI
from langchain.prompts import PromptTemplate, ChatPromptTemplate
from pprint import pprint
# OpenAI LLM Wrappers
llm = ChatGoogleGenerativeAI(model="gemini-2.0-flash", temperature=0.4)
system_prompt = """You are a helpful assistant. You will produce a figure or table based on the user's request.\n
Do not include any explanation or description. Just provide the code.\n"""
# 프롬프트 작성
request = """
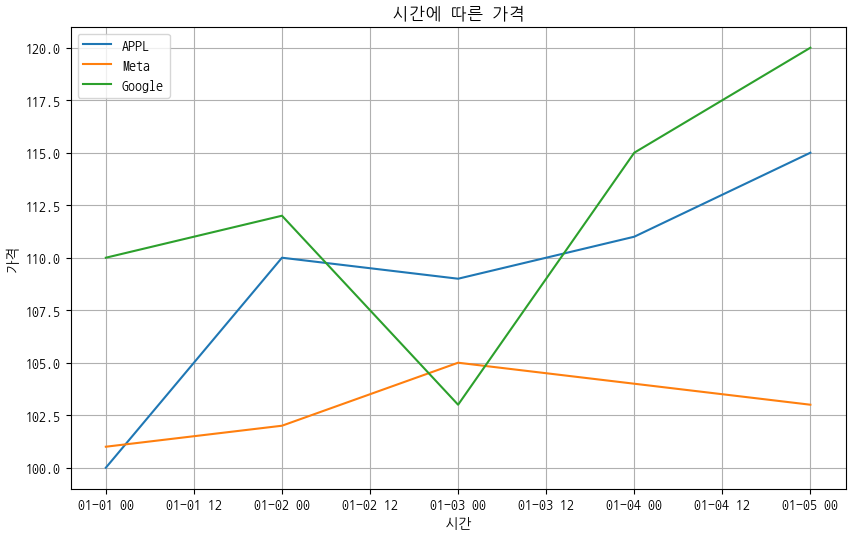
다음 데이터를 기반으로 시계열 차트 python matplotlib 코드를 생성하세요:
- 열: 이름, 시간, 가격,
- 데이터:
- APPL, 2025-01-01, 100
- APPL, 2025-01-02, 110
- APPL, 2025-01-03, 109
- APPL, 2025-01-04, 111
- APPL, 2025-01-05, 115
- Meta, 2025-01-01, 101
- Meta, 2025-01-02, 102
- Meta, 2025-01-03, 105
- Meta, 2025-01-04, 104
- Meta, 2025-01-05, 103
- Google, 2025-01-01, 110
- Google, 2025-01-02, 112
- Google, 2025-01-03, 103
- Google, 2025-01-04, 115
- Google, 2025-01-05, 120
데이터와 차트에 대한 설명은 포함
"""
prompt = ChatPromptTemplate.from_messages(
[
('system', system_prompt),
('human', '### User question ###: {request} ')
]
)
chain = prompt | llm
result = chain.invoke({"request": request})
pprint(result.content)
>>
('import matplotlib.pyplot as plt\n'
'import pandas as pd\n'
'\n'
"data = {'이름': ['APPL', 'APPL', 'APPL', 'APPL', 'APPL', 'Meta', 'Meta', "
"'Meta', 'Meta', 'Meta', 'Google', 'Google', 'Google', 'Google', 'Google'],\n"
" '시간': ['2025-01-01', '2025-01-02', '2025-01-03', '2025-01-04', "
"'2025-01-05', '2025-01-01', '2025-01-02', '2025-01-03', '2025-01-04', "
"'2025-01-05', '2025-01-01', '2025-01-02', '2025-01-03', '2025-01-04', "
"'2025-01-05'],\n"
" '가격': [100, 110, 109, 111, 115, 101, 102, 105, 104, 103, 110, 112, "
'103, 115, 120]}\n'
'\n'
'df = pd.DataFrame(data)\n'
"df['시간'] = pd.to_datetime(df['시간'])\n"
'\n'
'plt.figure(figsize=(10, 6))\n'
"for name in df['이름'].unique():\n"
" subset = df[df['이름'] == name]\n"
" plt.plot(subset['시간'], subset['가격'], label=name)\n"
'\n'
"plt.xlabel('시간')\n"
"plt.ylabel('가격')\n"
"plt.title('시간에 따른 가격')\n"
'plt.legend()\n'
'plt.grid(True)\n'
'plt.show()\n'
'\n'
'chart = plot(data)')
LIDA 논문의 깃허브 코드 (링크)를 살펴 보면 LIDA에서 작성한 프롬프트에서는 "DO NOT include plt.show()"라고 명시적으로 plt.show()를 배제한다. 또한 def plot() 함수를 사용하고 plt 객체 자체를 반환한다.
API로 불러온 모델이 chart = plot(data)를 반환하는 이유가 벌써 LIDA와 관련된 사항을 많이 학습해서가 아닐가 하고 의심하게 된다.
plt.show()를 하지 않아야 하는 이유
plt.show()는 현재의 figure를 메모리에서 지우기 때문에, plt.show()를 호출하기 전에 figure를 저장하거나, figure를 다시 생성한 후에 호출해야 한다.
exec 함수
LLM이 알려준 exec 코드의 작동은 아래와 같다.
exec 함수는 Python에서 문자열로 된 코드를 동적으로 실행할 수 있게 해주는 내장 함수다.
exec 함수를 사용하여 시각화 코드를 실행하고 차트 객체를 생성한다.
exec 함수는 보안상의 이유로 사용에 주의가 필요하다다.
외부에서 입력된 코드를 실행할 경우 악의적인 코드가 포함될 수 있으므로, 신뢰할 수 있는 코드만 실행하도록 해야 한다.
base64로 저장
이제 위에서 그린 이미지를 base64 형태로 저장해야 한다.
이는 이미지를 문자열로 변환하여 처리할 수 있기 때문이다.
이 대목은 테디노트님의 Multimodal RAG (링크)를 참조했다.
import base64
import io

# First execute the code to generate the figure
exec(preprocessed)

# Capture the current figure to a bytes buffer
buffer = io.BytesIO()
plt.savefig(buffer, format='png', dpi=100, bbox_inches='tight')
plt.close()  # Close the figure to free memory
buffer.seek(0)  # Move to the beginning of the buffer

# Encode the buffer to base64
img_str = base64.b64encode(buffer.getvalue()).decode('utf-8')

# Now img_str contains the base64 encoded image data
# You can save it to a file
with open("figure_image.b64", "w") as f:
    f.write(img_str)
그리고 한글 처리는 이 블로그 (링크)를 따라했다. WSL이라서 다소 귀찮은 작업을 거쳐야 하지만 주피터 노트북을 완전히 끄고,
matplotlib의 캐시를 확실하게 지우니 아래와 같이 제대로 한글이 나온다.
References:
https://github.com/microsoft/lida/blob/main/lida/components/executor.py
https://velog.io/@redgreen/Linux-linux%EC%97%90%EC%84%9C-Matplotlib-%ED%95%9C%EA%B8%80%ED%8F%B0%ED%8A%B8-%EC%84%A4%EC%A0%95%ED%95%98%EA%B8%B0
https://giveme-happyending.tistory.com/168
https://parksunwoo.github.io/dev/2023/02/20/base64-encoding-mime-utf-7-summary.html
https://github.com/teddylee777/langchain-kr/tree/main/12-RAG