LSTM 설명
LSTM은 Long Short Term Memory의 약자로 Recurrent Neural Network (RNN)의 하나다.
워낙 오래된 모델이라 논문에 대한 설명 보다는 알고리즘에 대한 설명한 하고 넘어가겠다.
설명을 생략하기에는 Tabular data 등의 예측 모델에 쓴다거나 하는 식으로 응용할 수 있기에 포스팅해야겠다 생각했다.

RNN은 기본적으로 sequential model로 순서가 유의미한 모델이다.
따라서 단어의 순서가 중요한 NLP라든가 시간에 따른 변화 추이가 중요한 금융 데이터 등에 쓰기 좋은 모델이다.
LSTM 역시 RNN의 하나로 sequential model이다.
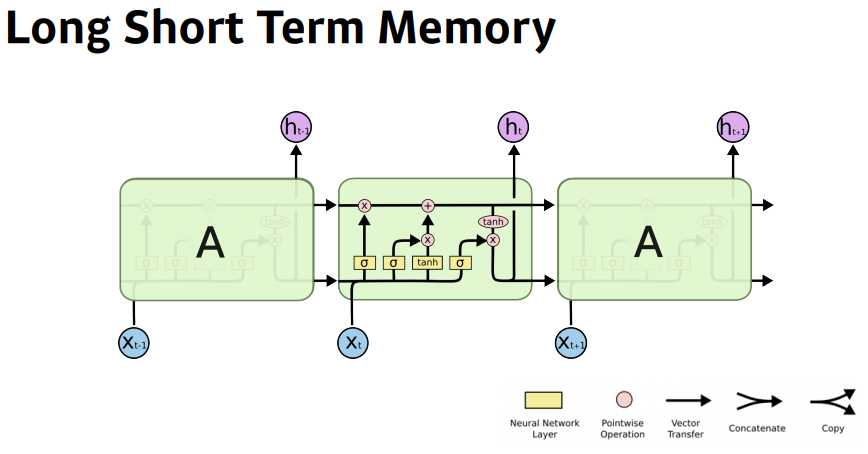
Figure 1을 보면 $t-1$의 이전 state의 cell의 정보가 현재 state인 $t$의 cell로 전해져 오는 상황임을 알 수 있다.
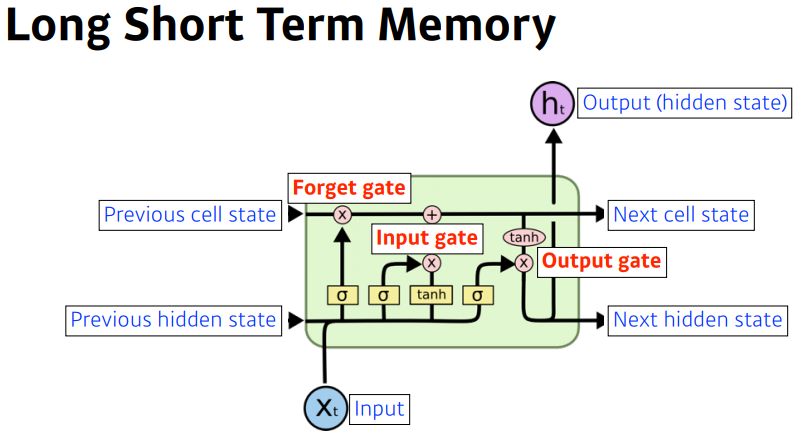
Cell at time (or state) $t$를 $Cell_t$로 표기하면, $Cell_t$를 통해 나온 features는 cell state인 $C_{t}$와 hidden state인 $h_t$가 되고, 이는 다음 state의 cell인 $Cell_{t+1}$으로 전해진다. 이제 밑의 Figure 2를 통해 Cell 내부의 구체적인 과정을 알아보자.
그리고 위 나온 $X_t$는 하나의 token이다. 따라서 input sequence는 문장이나 글이며 [ $X_1$, $X_2$, ... $X_n$ ]이 된다. 이때 n은 maximum length of sequence.

현재의 cell $Cell_t$는 input으로 직전의 hidden state인 $h_{t-1}$, 직전 cell state인 $C_{t-1}$, 그리고 현재 state의 input인 $X_t$의 세가지를 받는다.
그리고 Forget gate, Input gate, Output gate의 세 게이트를 통과하여 2개의 output을 도출한다.
2개의 output은 cell state인 $C_{t}$와 hidden state인 $h_{t}$다. 그리고 이 둘은 다음 state의 cell인 $Cell_{t+1}$로 보내진다.
아래에서는 Forget gate, Input gate, Output gate의 세 가지를 자세하게 설명한다.

Figure 3에서는 Forget gate와 Input gate의 작동을 설명한다.
Forget gate의 함수는 $f_t$ = $\sigma ( W_f \cdot [ h_{t-1}, x_t ] + b_f )$로 다음 state로 정보를 넘길지 말지를 결정한다.
이때, $\sigma$는 sigmoid function이다.
Input gate는 다음의 두 함수를 통해 작동한다.
$ i_t $ = $\sigma ( W_i \cdot [ h_{t-1}, x_t ] + b_i )$
$ \tilde{C_t} $ = $tanh ( W_C \cdot [ h_{t-1}, x_t ] + b_C )$
Cell state에 정보를 저장할지 말지를 결정한다.

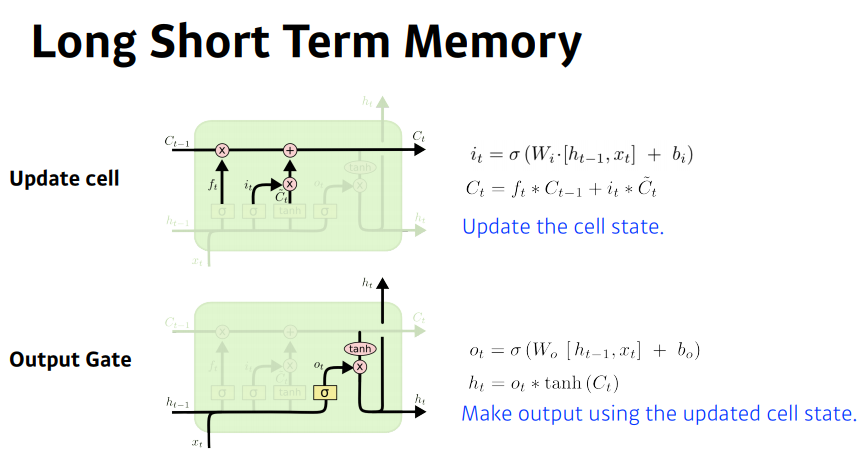
Figure 4에서는 Update cell과 Output gate를 설명한다.
위에 표시된 * 표시는 Hadamard Product (Element-wise Product)다.
Update cell에서는 Input gate를 통해 도출된 $ i_t $와 $ \tilde{C_t} $을 통해 $ C_t $를 생성한다.
$ C_t $ = $ {f_t} * {C_{t-1}} $ + $ {i_t} * $ $ \tilde{C_{t}} $.
Output gate에서는 다음의 함수를 통해서 다음 cell에 보낼 hidden state를 생성한다.
$ o_t $ = $\sigma ( W_o \cdot [ h_{t-1}, x_t ] + b_o )$
$ h_t $ = $ o_t * tanh(C_t)$.
LSTM PyTorch Implementation
PyTorch에는 LSTM의 개별 cell뿐만 아니라 이를 연이은 구조 자체를 클래스로 제공하고 있다.
"""CLASS torch.nn.LSTM(self,
	input_size,
	hidden_size,
	num_layers=1,
	bias=True,
	batch_first=False,
	dropout=0.0,
	bidirectional=False,
	proj_size=0,
	device=None,
	dtype=None)
"""
# input feature size = h_in_size 10,
# hidden size 20, the number of layers is 2
rnn = nn.LSTM(10, 20, 2)
# input shape is sequence length x batch size x h_in_size
# sequence length is the numer of tokens in one seuqence.
input = torch.randn(5, 3, 10)
# h0 shape is D*num_layers x batch size x h_out_size
# D is 2 if bidirectional, and 1 for unidirectional
h0 = torch.randn(2, 3, 20)
# c0 shape is D*num_layers x batch size x cell_out_size
c0 = torch.randn(2, 3, 20)
output, (hn, cn) = rnn(input, (h0, c0))
output.shape, hn.shape, cn.shape
>> (torch.Size([5, 3, 20]), torch.Size([2, 3, 20]), torch.Size([2, 3, 20]))
이렇게 간단한 코드만으로 LSTM을 구현할 수 있다.
PyTorch에서 구체적으로 어떻게 LSTM을 구현했는지 보기 위해서 rnn을 찍어본다.
rnn
>> LSTM(10, 20, num_layers=2)
AlexNet이나 VGGNet 같은 모델은 파라미터의 이름과 shape가 쭉 나오는데 LSTM은 그렇지 않다.
보다 자세하게 볼 수 있나 알아보기 위해서 파이썬의 dir 함수를 적용하여 변수와 메소드를 알아본다.
dir(rnn)
>>
['T_destination',
 '__annotations__',
 '__call__',
 '__class__',
 '__constants__',
 '__delattr__',
 '__dict__',
 '__dir__',
 '__doc__',
 '__eq__',
 '__format__',
 '__ge__',
 '__getattr__',
 '__getattribute__',
 '__getstate__',
 '__gt__',
 '__hash__',
 '__init__',
 '__init_subclass__',
 '__jit_unused_properties__',
 '__le__',
 '__lt__',
 '__module__',
 '__ne__',
 '__new__',
...
 'weight_hh_l1',
 'weight_ih_l0',
 'weight_ih_l1',
 'xpu',
 'zero_grad']
위와 같이 여러가지가 나오는데 자세한 결과는 너무 길어서 생략했다.
여러 변수 중에서 _parameters를 출력해본다.
for m in rnn._parameters:
    print(m)

>>
weight_ih_l0
weight_hh_l0
bias_ih_l0
bias_hh_l0
weight_ih_l1
weight_hh_l1
bias_ih_l1
bias_hh_l1
위와 같은 변수의 이름이 등장함을 알 수 있다. 각각의 parameters의 shape를 알아보기 위해 다음 코드를 실행한다.
for ws in rnn.all_weights:
    for w in ws:
        print(w.shape)

>>
torch.Size([80, 10])
torch.Size([80, 20])
torch.Size([80])
torch.Size([80])
torch.Size([80, 20])
torch.Size([80, 20])
torch.Size([80])
torch.Size([80])
설정한 hidden_dim은 20이고, 앞의 80은 20의 4배다.
위와 같은 사이즈가 나오는 이유는 torch.nn.modules.rnn.py의 파일로 확인할 수 있다.
class RNNBase의 항목에 보면 아래의 if elif else 구문이 나온다.
	if mode == 'LSTM':
            gate_size = 4 * hidden_size
        elif mode == 'GRU':
            gate_size = 3 * hidden_size
        elif mode == 'RNN_TANH':
            gate_size = hidden_size
        elif mode == 'RNN_RELU':
            gate_size = hidden_size
        else:
            raise ValueError("Unrecognized RNN mode: " + mode)
torch.nn.modules.rnn.py에서는 RNNBase, RNN, LSTM, GRU, RBBCellBase, RNNCell, LSTMCell, GRUCell을 정의한다.
이때, _VF.lstm_cell 등의 함수를 사용하는데 _VF는 torch._C._VariableFunctions을 활용하기 위함 함수라고 한다.
torch/jit/_builtins.py에 있는 ATen이란 함수를 사용한다고 하는데 C++과 관련된 수학 연산임을 알 수 있다.
보다 자세한 내용은 솔직히 이해하지 못했으니 자세히 공부할 사람들은 아래 레퍼런스를 들어가 보기를 권장한다.
이외에 참조할만한 코드는 PyTorch github의 main/benchmarks/fastrnns/factory.py 경로에 나와있다.
torch.nn.modules.rnn.py에서 궁금했던 점은 LSTM cell이 sequence length 만큼
for loop를 돌거나 sequential 형태로 나와있어야하는데 이를 찾지 못했다는 사실이다.
main/benchmarks/fastrnns/factory.py에 나온 코드에서는 varlen_lstm_creator 함수에서는 sequence length에 따른 for loop를 명시적으로 구현했다.
def forward(input, hidden):
        out, new_hidden = module(input, hidden)
        # plus (seq_len * three laynorm cell computation) to mimic the lower bound of
        # Layernorm cudnn LSTM in the forward pass
        seq_len = len(input.unbind(0))
        hy, cy = new_hidden
        # forward along the number of tokens (= seq_len)
        for i in range(seq_len):
            ln_i_output = ln_i(ln_input1)
            ln_h_output = ln_h(ln_input1)
            cy = ln_c(cy)

        return out, (hy, cy)
이번에는 LSTMCell을 직접 구현해보았다.
class LSTMCell(nn.Module):
    def __init__(self, input_dim, hidden_dim):
        super().__init__()
        # input and output shape 수정해야 함
        # Forget Gate
        self.forget_gate_x = nn.Linear(input_dim, hidden_dim)
        self.forget_gate_h = nn.Linear(hidden_dim, hidden_dim)
        self.forget_gate_sigmoid = nn.Sigmoid()
        # Input Gate
        self.input_gate_ix = nn.Linear(input_dim, hidden_dim)
        self.input_gate_ih = nn.Linear(hidden_dim, hidden_dim)
        self.input_gate_sigmoid = nn.Sigmoid()
        # Update Cell
        self.input_gate_cx = nn.Linear(input_dim, hidden_dim)
        self.input_gate_ch = nn.Linear(hidden_dim, hidden_dim)
        self.input_gate_tanh = nn.Tanh()
        # Output Gate
        self.output_gate_x = nn.Linear(input_dim, hidden_dim)
        self.output_gate_h = nn.Linear(hidden_dim, hidden_dim)
        self.output_gate_sigmoid = nn.Sigmoid()
        self.output_gate_tanh = nn.Tanh()

    def forward(self, x, h, c):
        # Forget gate
        f_t = self.forget_gate_h(h) + self.forget_gate_x(x)
        f_t = self.forget_gate_sigmoid(f_t)

        # Input gate
        i_t = self.input_gate_ih(h) + self.input_gate_ix(x)
        i_t = self.input_gate_sigmoid(i_t)
        c_t = self.input_gate_ch(h) + self.input_gate_cx(x)
        c_t = self.input_gate_tanh(c_t)
        # Update Cell
        c_t = (f_t * c) + (i_t * c_t)

        # Output gate
        o_t = self.output_gate_h(h) + self.output_gate_x(x)
        o_t = self.output_gate_sigmoid(o_t)
        h_t = o_t * self.output_gate_tanh(c_t)

        return (h_t, c_t)
Figure 2에 나온 LSTM Cell의 구현이다.
예시 input을 사용하여 올바르게 작동하는지 확인한다.
# input shape is sequence length x batch size x h_in_size
input = torch.randn(5, 3, 10)
# input shape is 1 (one token) x batch size x h_in_size
x0 = torch.randn(1, 3, 10)
# h0 shape is D*num_layers x batch size x h_out_size
# D is 2 if bidirectional, and 1 for unidirectional
h0 = torch.randn(2, 3, 20)
# c0 shape is D*num_layers x batch size x cell_out_size
c0 = torch.randn(2, 3, 20)

# LSTM Cell 선언
cell = LSTMCell(10, 20)

# Forwarding
h1, c1 = cell(x0, h0, c0)
h1.shape, c1.shape
>> (torch.Size([2, 3, 20]), torch.Size([2, 3, 20]))
포워딩이 제대로 이루어지고 output의 shape 역시 정상적으로 이루어져서 h1, c1이 h0, c0와 같은 사이즈가 됨을 알 수 있다. 그리고 위에서도 언급했듯이 x0는 하나의 token이므로, 뒤에 올 LSTM Cell들에 대해서는 해당 state에 맞는 token들을 넣어줘야 한다.
class LSTM(nn.Module):
    def __init__(self, input_dim, hidden_dim, num_layers):
        super().__init__()
        if num_layers > 1:
            self.lstm_cell = nn.ModuleList([LSTMCell(input_dim, hidden_dim) for i in range(num_layers)])
        else:
            self.lstm_cell = LSTMCell(input_dim, hidden_dim)
        self.model = nn.ModuleList([self.lstm_cell for i in range(config.seq_len)])
        self.outputs = []

    def forward(self, seq, h, c):
        # x안에 담긴 token을 하나씩 빼내서
        # layer마다 forward 시켜야 한다.
        for idx, s in enumerate(seq):
            h, c = self.model[idx](s, h, c)
            self.outputs.append(h)
        return self.outputs, h, c
Cell 마다 token을 할당하고 $h_{t}$와 $c_{t}$를 갱신하는 방식으로 for loop를 사용하여 구현한 LSTM 모델이다.
lstm = LSTM(10, 20, 1)
h_n, c_n = lstm(input, h0, c0)
len(outputs), outputs[0].shape, h_n.shape, c_n.shape
>> (5, torch.Size([2, 3, 20]), torch.Size([2, 3, 20]), torch.Size([2, 3, 20]))
Output shape를 보면 length는 sequence length와 똑같고, output element의 shape도 $h_{t}$와 동일하게 정상적으로 작동한다고 판단할 수 있다.
LSTM은 기본적으로 sequential 모델이므로 $h_{t}$를 구하기 위해서는 $h_{t-1}$을 도출해야 되고,
이는 for loop를 강요하여 병렬화가 힘들다는 사실을 코드 구현을 통해서도 알 수 있었다.
References:
고려대학교 XAI506: Deep Learning
https://pytorch.org/docs/stable/generated/torch.nn.LSTM.html
https://mmuratarat.github.io/2019-01-19/dimensions-of-lstm
https://github.com/pytorch/pytorch/blob/main/torch/nn/modules/rnn.py
https://github.com/pytorch/pytorch/blob/main/benchmarks/fastrnns/factory.py#L223
https://github.com/pytorch/pytorch/blob/main/torch/_VF.py
https://github.com/pytorch/pytorch/issues/21478
https://blog.naver.com/songblue61/221853600720
https://dongsarchive.tistory.com/67#google_vignette
https://velog.io/@shonsk0220/PackedSequence-11-6
https://happy-jihye.github.io/nlp/nlp-2/#multi-layer-rnn
'NLP' 카테고리의 다른 글
| Transformer (2017) 논문 리뷰 (0) | 2024.06.25 |
|---|---|
| GRU 모델 설명 (0) | 2024.04.11 |
| 딥러닝 기반 NLP 모델들 (0) | 2024.03.06 |
| 자연어처리 (NLP) 기초 (0) | 2024.02.29 |
| LLM Models and Applications (0) | 2024.02.23 |


