본격적인 GPT의 등장 이전의 NLP 분야에서 가장 유명한 논문이 바로 transformer 아키텍쳐가 소개된 Attention Is All You Need일거라 생각한다. (링크)
해당 논문의 저자는 Ashish Vaswani, Noam Shazeer, Niki Parmar, Jakob Uszkoreit, Llion Jones, Aidan N. Gomez, Lukasz Kaiser, Illia Polosukhin다.
Shazeer는 최근 나오는 논문들에서도 자주 보이는 이름이라 괜시리 반갑다.
Abstract
기존의 지배적인 sequence transduction (변환, 도입)은 복잡한 recurrent 혹은 encoder와 decoder를 포함한 cnn에 기반했다. 인코더와 디코더를 연결한 모델들은 최상의 결과를 보였다. 본 논문에서는 Transformer를 소개하는데 단순한 네트워크 구조를 지녔으며 오직 attention 메커니즘에만 의존한다. WMT 2014 English-to-German 번역 태스크에서 28.4 BLEU를 달성하였고 WMT 2014 English-to-French에서는 BLEU score르 41.8을 달성하여 SOTA를 달성하였다. 이는 8개의 GPU를 통해서 3.5일 동안 학습한 결과다.
3 Model Architecture

Transformer는 크게 Encoder와 Decoder 파트로 나뉜다.
3.1 Encoder and Decoder Stacks
Encoder는 N = 6의 동일한 레이어의 stack으로 구성되었다. 각각의 레이어는 two sub-layer를 가진다.
Multi-head self-attention과 position-wise fully connected feed-forward network다.
Residual connection을 적용하였으며 이를 적용하기 전에 layer normalization을 취한다.
따라서 Each sub-layer의 output은 LayerNorm($x$ + Sublayer)$x$))다.
그리고 residual connection을 위해서 모든 sublayer의 output와 embedding layer의 dimension은 $d_{\operatorname{model}}$ = 512다.
Decoder는 encoder와 마찬가지로 N = 6의 동일한 레이어의 stack으로 구성되었다. 각각의 레이어는 encoder와 같은 two sub-layer에 더해서 추가적인 masked multi-head attention을 가지고 있다. Masking은 현재 지점이 $i$일 때 더 나중의 값들인 all $j$ where $j > i$인 경우는 가려서 참조하지 못하도록 한다.
PyTorch에서 Masking은 masked_fill_ 메소드를 통해서 사용할 수 있다. (링크)
PyTorch의 Decoder Layer (링크)를 살펴보면 _sa_block 함수는 self.self_attn은 이용한다.
sefl.self_attn은 MultiHeadAttention의 클래스 (링크)를 상속한다.
self.self_attn = MultiheadAttention(
            d_model,
            nhead,
            dropout=dropout,
            batch_first=batch_first,
            bias=bias,
            **factory_kwargs,
        )
MultiHeadAttention의 _forward_impl 함수를 보면 501번째 줄 부터 attn_mask를 어떻게 다루는지 보인다.
if attn_mask is not None:
    if attn_mask.dtype == torch.bool:
        attn_output_weights.masked_fill_(attn_mask, float("-inf"))
    else:
        attn_output_weights += attn_mask
510번째에서 위 attn_output_weights에 softmax를 취하는데 -inf 값에 소프트맥스를 취하면 0이다.
따라서 이를 참조하지 않고 그라디언트 업데이트를 하지도 않는다.
attn_output_weights = F.softmax(attn_output_weights, dim=-1)
3.2 Attention

Attention은 Scaled Dot-Product Attention을 $h$번 수행하는 Multi-Head Attention을 사용했다.
Scaled Dot-Product Attention
쿼리 Q, 키 K, 밸류 V를 사용해서 문장들간의 관계를 학습한다.
Attention($Q, K, V$) = softmax($ ( \frac{QK_T}{\sqrt{d_k}} )V$)
보다 구체적인 예시는 딥러닝을 이용한 자연어 처리 입문 (링크)와 The illustrated Transformer (링크)의 설명과 자료를 참고해서 작성했다.
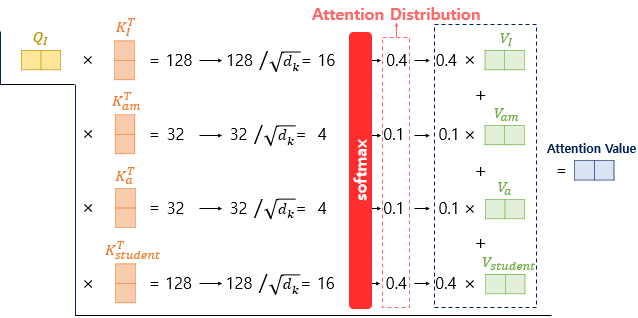
I am a student라는 입력 문장이 있는데 이를 I, am, a, studnet 라는 토큰 (token)으로 쪼갰다고 가정한다.
이때 self-attention in encoder에서는 입력 문장끼리의 관계를 학습한다.
따라서 I과 am, a, student의 관계를, am과 I, a, student의 관계, ... 해서 입력 문장 토큰들의 모든 관계를 학습한다.

우선 student라는 토큰이 있을 때 이에 대한 Q, K, V vectors를 구한다.
이는 $W^Q$, $W^K$, $W^V$을 통해서 구한다.

이제 I라는 토큰의 쿼리인 Q와 I, am, a, student 각각의 K transposed vector의 doc product를 구한다.
이를 attention score라고 한다.

위 attention score를 softmax를 통해서 확률로 변환한 다음 I, am, a, student의 V vector를 weight 삼아서 더하면,
토큰 I에 대한 최종적인 attention value를 구할 수 있다.
이제 개별 토큰이 아닌 문장 단위로 계산해보자.

Q$K^T$를 통해 attention scores를 구한다.
그렇다면 dimension은 각각 다음과 같다.
Sequence length = 4이고, $d_{\text{model}}$ = 2다.
$4 \times 2$ * $2 \times 4$ = $ 4 \times 4 $의 attention scores matrix가 나온다.
모든 토큰 쌍에 대한 정보이므로 sequence length x sequence length인 행렬이 나오는게 당연하다.

softmax를 통해서 확률을 구한다음 V를 곱하면,
$4 \times 4$ * $4 \times 2$ = $ 4 \times 2 $ 사이즈의 Attention value matrix가 나온다.
Multi-Head Attention
위 Scaled dot-product attention을 $h$개 사용해서 더 풍부하게 학습하게 하는 효과가 있다.
즉 $h$개의 관점에서 다각도로 토큰들 간의 관계를 학습한다고 보면 된다.
MultiHead($Q, K, V$) = Concat($\operatorname{head}_1$, ..., $\operatorname {head}_h$)$W^O$
where $\operatorname {head}_i$ = Attention($Q {W_{i}}^{Q}, K {W_{i}}^{K} , V {W_{i}}^{V} $).
$ {W_{i}}^{Q} \in \mathbb{R}^{d_{ \operatorname{model}} \times d_k}$, $ {W_{i}}^{K} \in \mathbb{R}^{d_{ \operatorname{model}} \times d_k}$, $ {W_{i}}^{V} \in \mathbb{R}^{d_{ \operatorname{model}} \times d_v}$,
and $ {W_{i}}^{O} \in \mathbb{R}^{d_{h d_v \times \operatorname{model}}}$.
저자들은 $h$ = 8, $d_k$ = $d_v$ = $d_{\operatorname{model}} /h$ = 64 를 사용했다.
Multi-Head Attention PyTorch 코드를 살펴보면 다음과 같이 multi-head를 구현한다.
389번째 줄을 보면 아래와 같다. Head의 개수인 $h$로 나눈다.
head_dim = self.embed_dim // self.num_heads
524번째 줄 부터 나오는 코드를 보면 view를 통해서 다시 embed_dim으로 변환함을 알 수 있다.
즉 multi-head를 다시 concat하는 과정이다.
이때 bsz는 batch size고 tgt_len은 target sequence length다.
attn_output = torch.bmm(attn_output_weights, v)
assert list(attn_output.size()) == [bsz * self.num_heads, tgt_len, head_dim]
if self.batch_first:
    attn_output = attn_output.view(bsz, tgt_len, self.embed_dim)
else:
    attn_output = (
        attn_output.transpose(0, 1)
        .contiguous()
        .view(tgt_len, bsz, self.embed_dim)
    )
위 contiguous 메소드는 실제로는 거의 필수인듯하다.
메모리 상에서 Tensor에 저장된 값들이 연속적으로 저장되도록 하기 때문에,
적용하지 않으면 오류가 나는 경우도 있다고 한다.
관련된 한국 PyTorch 커뮤니티 글 (링크)
Position-wise Feed-Forward Networks (FFNs)
FFN에서는 Multi-head Self-Attention (MSA) 에서 다각도로 학습한 토큰 간의 관계 피쳐들을 다시 종합하고 정제하는 단계다.
그리고 이 단계에서 non-linearity 비선형성도 추가한다.
FFN($x$) = max(0, $x W_1 + b_1$) $W_2$ + $b_2$
$ d_{\text{model}} $ = 512이고, $d_{ff}$ = 2048 이다.
위 연산은 ReLU와 Affine transformation을 취한 연산이다.
Positional Encoding
짝수번째와 홀수번째는 각각 다르다.
토큰의 위치를 나타내는 방법으로는 One hot encoding이나 integer encoding 등등 여러가지 방법이 있지만 여기선 sine과 cosine을 사용했다.
그 식은 아래와 같다.
$PE_{(pos, 2i)}$ = $sin(pos / {10000}^{2i / d_{\operatorname{model}} })$
$PE_{(pos, 2i+1)}$ = $cos(pos / {10000}^{2i / d_{\operatorname{model}} })$
자세한 설명은 링크1, 링크2, 링크3 을 참고하면 좋다.
핵심은 다음과 같다.
Positional embedding vector의 각 element 간의 차이를 작게 만든다.
여기서는 사인과 코사인을 활용해서 [-1, +1] 의 범위로 한정한다.
그리고 주기를 다르게 설정해서 서로 동일하지 않도록 만든다.
5 Training
Training Date and Batching
WMT 2014의 영어-독어는 4500만개의 문장 페어가 있다. 각 문장은 byte-pair encoding (BPE)로 인코딩 되어있다.
Vocab size는 37,000 tokens다.
영어-불어(프랑스어)의 경우 46000만개의 문장 페어가 있다. 32,000개의 word-piece vocab 사이즈를 가지고 있다.
대략적인 sequence length에 따라서 문장 페어가 배치로 묶였다.
각각의 트레이닝 배치는 약 25,000개의 source tokens를 가지고 약 25,000개의 target tokens를 지니도록 구성되었다.
Hardware and Schedule
8개의 Nvidia P100 GPUs를 사용했다.
베이스 모델은 총 100,000 steps를 거쳤으며 이는 약 12 시간이 걸렸다.
가장 큰 모델의 경우 300,000 스텝이며 약 3.5일이 소요되었다.
Optimizer
Adam optimizer를 사용했으며 $\beta_1$ = 0.9, $\beta_2$ = 0.98, $\epsilon$ = $10^{-9}$를 사용했다.
또한 학습률 learning rate의 경우 아래 공식을 따랐다.
$lrate = {d_{\text{model}}}^{-0.5} \cdot \text{min}( \text{step_num}^{-0.5}, \text{step_num} \text{warmup_steps}^{-1.5} ) $
warmup_steps = 4000으로 설정했다.
Regularization
Residual drop을 sublayer의 input과 normalization을 적용하기 전에 적용했다.
또한 encoder와 decoder에서 embeddings와 positional encodings의 합 다음에 적용했다.
drop rate $p_{drop}$ = 0.1로 설정했다.
6 Results

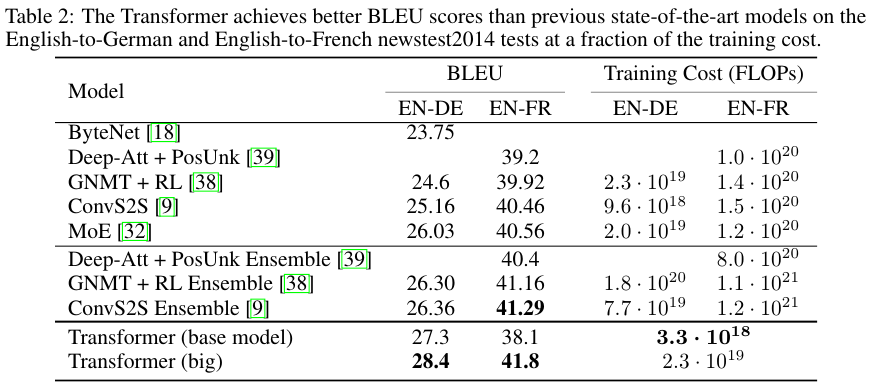
Transformer가 다른 모델들에 비해서 더 나은 성능을 보여준다.

여러가지 transformer 모델 중에서 big인 경우가 가장 좋은 성능임을 확인할 수 있다.
Transformer의 모델 사이즈도 위 표에 적혀있다.
Base의 경우 파라미터 수가 65 x 10e6이라서 65,000,000인 65M이며
Big의 경우 213 x $10^6$이라서 213,000,000인 213M이다.
References:
https://jalammar.github.io/illustrated-transformer/
https://www.blossominkyung.com/deeplearning/transfomer-positional-encoding
https://velog.io/@ailab/Transformer-Architecture-The-Positional-Encoding
https://github.com/pytorch/pytorch/blob/v2.6.0/torch/nn/modules/transformer.py#L609
https://github.com/pytorch/pytorch/blob/main/torch/ao/nn/quantizable/modules/activation.py#L524
https://discuss.pytorch.kr/t/contiguous-tensor/889
'NLP' 카테고리의 다른 글
| GPT (2018) 논문 리뷰 (0) | 2024.07.22 |
|---|---|
| BERT (2018) 논문 리뷰 (0) | 2024.06.25 |
| GRU 모델 설명 (0) | 2024.04.11 |
| LSTM 모델 설명과 PyTorch Implementation (0) | 2024.04.09 |
| 딥러닝 기반 NLP 모델들 (0) | 2024.03.06 |


